Showing posts with label 6mm. Show all posts

Wednesday, February 3, 2021

Basing PR&FR - 6 mm - What was done on January 2021

 Hi,

As a follow up about the few past weeks, here is the status of on-going Prussians and French, finally based, and so done.

As an introduction, here they are :


From top left, to bottom righ are : 2 PR Uhlan Rgt (1st and 3rd), 3 Landwehr batallions (PR), 1st Rgt des Chasseurs à Cheval de la Garde (FR), and 3 batallions of grenadiers from la Vieille Garde (FR).

Before insights, here is how I based them.
I have very (I mean, really very) few place for this hobby.
That is the reason why I practice it by sessions.
Anytime, I need to get anything cleaned and prepared, then anything put back in place (and cleaned as well).
That "entry" ticket cost me about 15 minutes on each side.
So, I qualify and plan what to do, prepare a volume so not to spend more time setting/un-setting than really working, then... I start a session.

This session was based on the following :

Enough minis on their bags, enough bases, glue and some basic tool... so let's go.
Baccus strips are 4 minis per strip. I base 2x3 minis in two rows per base.
So, cutting is obviously needed.
But as a first step, strips bases need to be flatten because of "melting spots(?)" that could remain and painting temporary basing glue residues.


Obviously I do that as well before initial painting temporary basing, but now, up to base mini by mini sometimes, I pay a special attention so that each mini have a perfectly flat basement. It's easier, and safer, to do this with a strip rather than on individual detached minis. Also, take extreme care : Just slide gently the strips on the tool : hold them firmly but smartly, don't break anything !

I cut the bases as small as possible while preserving mini attach points to its' basement. So each strip is reduced to three minis strips, and I obviously keep the fourth one.

When basing, I always start by "the fourth" minis, the ones that are alone, and put 3 of them on the rear rank. This way, I may position them gently, not being in trouble with a front rank that would not let finger room for alignment. Front ranks are always the three "survivors" of the original strip. I glue them at a second step, as such :


The glue I use to set them in place is a basic (but really good) gel glue from Scotch (the green one - see first picture). It perfectly does the job for years and is not expensive.
Once minis are in place, I use white glue to seal them and flock.
I put a somewhat thick layer (very slightly diluted) on the base with an old brush.
Then I flock.
As it will dry, all minis will be sealed one to each other, reinforcing the overall solidity of the base.


For flocking, I use basic wood sawdust. On the picture it seems brown, but in fact it's green. (Mobile camera used)
Go to a place where they cut wood, be polite and gentle, ask accordingly and then you should get enough of it for 10 years.
Tint it with basic acrylics of various bright browns, green, and yellow (and mixes), let it dry (to avoid moisture), then you are done.
Don't forget the tip for the guy behind the saw...

You may find better "dedicated" basing flocking material, obviously, but it is expensive and for the size of the bases I deal with it is not justified on my side.

So, after all this "blabla", some closer pictures.
First the Prussians :

Then La Vieille Garde :

And finally les Chasseurs à Cheval de la Garde :


Do not hesitate to comment or share you way for basing.


Thanks for reading,
Cheers and take care.

Bruno.


Sunday, January 31, 2021

Napoleonic Prussians - 6mm - 3 Landwehr battalions

 Hi,

So, those three battalions are painted, varnished and ready to be based.
Here they are :

Flags are from my napflag stock. It seems historical flags attribution to Landwehr was somewhat random during the Napoleonic area, so for those of you that are knowledgeable about those they may sound as an heresy, but however I had to make a choice. Do not hesitate to comment your insights, as more Landwehr battalions will join in the future.

Colors used are from acrylic Prince August range (except specified otherwise).
Here they are :

Pant and rolled mantel : 836 (grey)
Uniform : 965 (blue)
Distinctive  : 817 (red)
White : 912 (ivory)
Black : 950
Rifle wood : 846 (mahogany ?)
Skin: 927
Gold : 996
Steel : Vallejo Metal Color 77.716

They have joined their little bag, waiting for basing.
Perhaps will I start basing as I have enough bases now and enough miniatures to start a session.
Not sure yet (will have lunch first - nothing is better than a good "blanquette de veau" to make your mind ;-) ).

Regarding Prussian painting, as next step, I also plan one artillery battery (4 guns / 16 crews) and 2 Hussars regiments ( 12 miniatures each).

And yes... after that I will take a break from Prussians, adding some more British Infantry and Cavalry to my armies...

Cheers and take care,

Bruno.

Saturday, January 30, 2021

Nap flags - 6mm to 15 mm - A tribute to Mr. Pendlebury

 Hi,

Before getting back to my Prussians, I though it was time for a tribute.
About 25+ years ago I discovered a site that you may know, with a huge work about flags of the Napoleonic area.
From that time, I always use it as a major reference for flags.
This site is napflags, kindly hosted by www.warflag.com since end 2001.
Here is a direct link to the napflags index :

napflags by Mr. Alan Pendlebury

Resized and printed, here is what it gives at 6mm scale :

This is a sample of mounted flags. Left to right are some French (1812 and 1804 patterns), Austrian, Prussians, English and Brunswick flags.

The site contains a quite exhaustive listing for any nation of that time, their flags and also historical information.

Flags have to be resized. For this I use Inkscape, a powerful open-source vector drawing tool. I paste the flags picture in it, create a semi transparent colored box at the exact size I wish (ie. 9x9 mm) and put it at the foreground, then resize the flags bitmap in the background to match this size matrix, as such :


This way I create a full page of flags, as such :


Then I print on inkjet paper of good quality (labeled as "photo" quality, but light paper - should be less than, or around, 80g/m2 - low cost but good material), label the regiments when it has to, and cut flags strips :


Here is part of my flags, with mostly French and Prussian flags.

I also use this tool and napflags to label my packing boxes, labels, counters, etc... as such :


That's how I proceed for my flags, and that would not have been possible without the huge work done by Mr Pendlebury, as well as his will to share it freely.

So I just wanted to say thanks to him, wherever he is, and share with everyone it could help and would not be aware of this exceptional resource.

Thanks Mr. Pendlebury.


Monday, January 25, 2021

Napoleonic Prussians - 6 mm - Uhlans 1st & 3rd rgt (1815)

 Hi,

Short update as I completed those by yesterday evening.
Time for varnish to dry, and as I am now on free time (vs. job), here they are :


Top 4 strips are 1st rgt. Then the 3rd. They are Baccus minis.
I did not expected doing them past Sunday, but in fact I did.
It took me about 3 hours.

Now, I have 3 Landwehr batalions to paint... by next Sunday.
I will probably start later on this evening.

Cheers and stay safe,

Bruno.

Sunday, January 24, 2021

Napoleonic French - 6mm - WIP part II

 Hi,

Here is a short advancement status about the old guard I started about one week ago.

Status and pictures :

On going Grenadiers of the old guard are painted and varnished.


Same thing about the Chasseurs à Cheval de la garde.


They have been painted on evenings, by 1+ hour sessions along the week.
As a total time spent, I may estimate between 4 and 5 hours of total work to get there (for each of Grenadiers and Chasseurs, so about 10 hours total)

Paints I used :

I used a black primer (brushed Humbrol black matt 33, slightly diluted) then I used Prince August (Vallejo) acrylic colors except when said otherwise. Here are their references (numeric only as names are in french).
Conversion tables exist between PA and Vallejo references, so that should not be an issue if use Vallejo rather than PA.(ie : (PA) 970 = (V) 72)

For grenadiers :

Uniform blue : 965
All whites : 918 (Ivory - I never use pure white)
All blacks : 950
Red : 817 (kind of scarlett red)
Rifle wood : 846 (Mahogany ?)
Back pack : 875 (clear brown beige ?)
Rolled jacket : 836 (a grey - realized once done it should have been blue for the guard)
Flesh : 327
Gold : 996 - Metal colors in standard Vallejo/PA are not good. I still use that one (as I have it) but it has to be applied on a black background. At a time I will better use Vallejo Airbrush Metal Color (see thereafter).
Steel : Vallejo Airbrush Metal Color 77.716 (Aluminio satin) applied with a brush (obviously). That metal color is far better than any conventional Vallejo/PA metal colors.

For Chasseurs à Cheval :

Green (saddles/uniform) : 970
Trumpet exception (blue) : 840
Yellow : 948 - I prefer that "gold yellow" as offering better coverage and color depth than regular yellow.
Horses : 846
All other colors (red, white, black, metal,...) are like Grenadiers.

As a varnish I use an art acrylic painting varnish (Amsterdam 115 MATT for acrylic - brush applied). My 250 ml bottle is still 2/3 full after 3+ years... I pass 2 layers of it each tme. It makes it inexpensive in time, does stay clear and offers a good protection. Only thing is that it is a little bit satin but at 6mm it perfectly does the thing on my side.

What next ?

Still to be done is the basing. I have too few bases ready for them, so will have to cut and prepare (far) more. As I usually do, I put them in a bag waiting for bases to be ready. Also, I prefer to run dedicated basing sessions so will anyway wait to have more minis to be based before running a session :


Yep. Not sure they will all fit the 4 ridiculous bases remaining so far ;-).

Now, my French backlog :


So, here are :

  • Line infantry
  • Light infantry skirmishing
  • Lancers of the line
  • Lancers of the guard
  • Elite Hussars companies
  • Carabiniers
  • Foot artillery
  • Horse artillery
  • Limbers
  • remainings of previous backlog, so few of :
    • Hussars
    • Dragoons
    • Cuirassiers
    • Command

Anyway, my current focus is on Prussians.
So this week, I plan doing :

  • 3 Landwehr batalions (24 minis each)
  • 2 Uhlans regiments (12 minis each)

Once this will be done, I will probably change my mind with some english troops (that are nice too ;-)) for which I have an even more huge backlog.

Cheers and stay safe.

Bruno.


Friday, January 22, 2021

Napoleonic command - 6mm - FR & UK

 Hi,

This week evenings I worked a bit on my french old guard but not only.
For monthes I had some painted command I did not based yet.
Mostly French and English.
So, I did it as it was not that long after all (spent less than 1.5 hour in three evenings)...

They are mixed minis from different providers in time, so I am not sure of whom they were from  (except for the Baccus english and some frenchies)

I took pictures yesterday evening and quickly post them to conlude my remotee lunch break.


Here they are for France...


... and for England

They are based on 1, 2 and 5 € cents coins.
Depending on rules, 1 mini means Brigade command, 2 minis Division command, 3 minis Army corp command, or respectively ADC, Brigadier, Division at lower gaming scale.

This week end I'll continue my old guard and prepare some prussian Uhlans.
I will see if I have something advanced enough to be shareable.

Now back to job.
See you later...


Sunday, January 17, 2021

Napoleonic French - 6mm - WIP

 Hi again,

As said in my Prussian WIP I, I am completing my French side in parallel with some French Guard. Here as well, those minis are from Baccus.
Currently planned are 3 old guard infantry batalions and 1 Chasseur de la guarde regiment.
I just ended up with a first set of strips, including command and some line.
Here they are just after first varnish layer.


As usual, light balance is wrong (underlying support is deep flat black, not blue), but however...
Flags are from napflags free flags, resized with inkscape as 7x7 mm side wide, then printed on photo paper. Historically, French flags were far smaller, but with scale, I prefer to size them to the available space left on the minis poles.

Here are two closer views on the command then line strips I did on that session.


Obviously, when looking so close paint job seems really bad looking, but you never see them that close on table top. To give you an order of idea, here is a comparison with a 35 mm height zinnfiguren.

Another time, picture is weird (contrasts are crazy and colours not right) and Zinnfiguren will be addressed in other posts, but it was just to give an order of idea for those not familiar with 6mm.

Next to come are those folks I introduced at the begining of this post, primed 2 weeks ago.


My french army is currently the biggest one I have and it's backlog of to-be-done minis is important. I will probably share on that as the old guard will move forward.

Cheers,

Bruno.


Saturday, January 16, 2021

Napoleonic Prussians - 6mm - WIP

 Hi,

In 2021 I plan finishing my ongoing Pussians.
Here are 2 line regiments, 2 battalions each, I just flocked.
They are 2nd and 3rd as per 1815.
Minis are from Baccus.
Pictures have been taken with a mobile and somewhat yellow light, so shadows are somewhat "greenish", but real colors are OK.


Battalions are sized as Small (3 bases) or Medium (4 bases) so far. Those are my last remaining Prussian Line miniatures, and I had not the exact ratio between command and line. In my next order, I will manage solving that, including some more line bases to extend some Prussians to large units (5 bases) if required.

Next step will be creating their packing box.

So, in addition of now owning 5 line regiments (10 battalions) what is next for 2021 ?

Well, I plan addressing this (in other things)...


In the background are some ready to be primed Uhlans, with others still in their bag. I have material to build 3 to 5 regiments depending on gaming size for units.
Also, in bags are Landwehr (8 to 10 battalions), Command, Hussars (3 to 5 rgts) and 2 artillery batteries (2 guns each).

This is not a big backlog, but I will share as I move forward with those Prussians.

In parallel I am working on some french old guard and command.

As well, I have more important backlog for French and English troops, but that is another topic.

Cheers,

Bruno.

Tuesday, January 12, 2021

As time goes on... (Part 2 - some 6mm stuff)

Let's use my lunch break to share a second post.

I tried 6mm miniatures long ago.
I liked that scale very much from day 1 I discovered it.

I ordered, from time to time some units and packs, initially for collection/fun.
I then quickly started to play them with short solo games, requiring no more than 50x70 cms space as I reduced standard rules scale.

Then, from year to year I slowly extended my troops, and finally get nuts about 6 mm.

Those are really cute, fast and easy to paint despite what one could think if he have not tried yet.

Also, they are wonderful on your table, should it be for mass effect, if you have room for that, or to play short games at reduced scale in a limited space that is mostly my case.

Finally, they have a very good price/quality ratio.

I've finally gone with Baccus miniature, and am really happy with them.

Acceleration occurred one year and a half ago. I was in vacations, bringing with me my "survival kit". That was meaning brushes, paints and a good load of miniatures.

It was one bag more in the family car, but we somewhat survived that. ;-)

Back from vacations, end of July 2019, I had painted (and varnished) a good number of strips. It was the first time since years I had not done somewhat mass painting, and it was good to feel.


Here they were at that time, straight out of my luggage :


Then I based them...

I did some french line and light infantry, lancers of the line and the guard, dragoons, chasseurs and cuirassiers. Also, I started some Brunswick and English infantry, cavalry, artillery and command as well. (I only had Austrians and Prussians from the allied side at that time).

Then it extended a bit in time...

Here is the main part of my current collection as it looked few days ago.


Initially I tried different base formats, but the one that suites me better for about 1 year is 6 minis on 2 ranks for infantry, 2 minis on 1 rank for cavalry. All bases are 1.5x1.5 cms.

Rules I use are amended General de Brigade and more recently General d'Armee, where an infantry battalion is between 3 and 5 bases.

For 2021 I plan completing my Prussians with some more infantry Line and Landwehr, Uhlans and more command. I also plan adding some British guard or elite troops, and when it will be possible (due to Covid cart closing) ordering and starting a Russian Brigade or two.

I will follow up on that in later posts.

Cheers and stay safe !

Bruno.

Thursday, November 12, 2009

GHQ 6mm : Wow !!!


Hi there,

Last firday, just before leaving Paris I found my GHQ order in my mailbox.
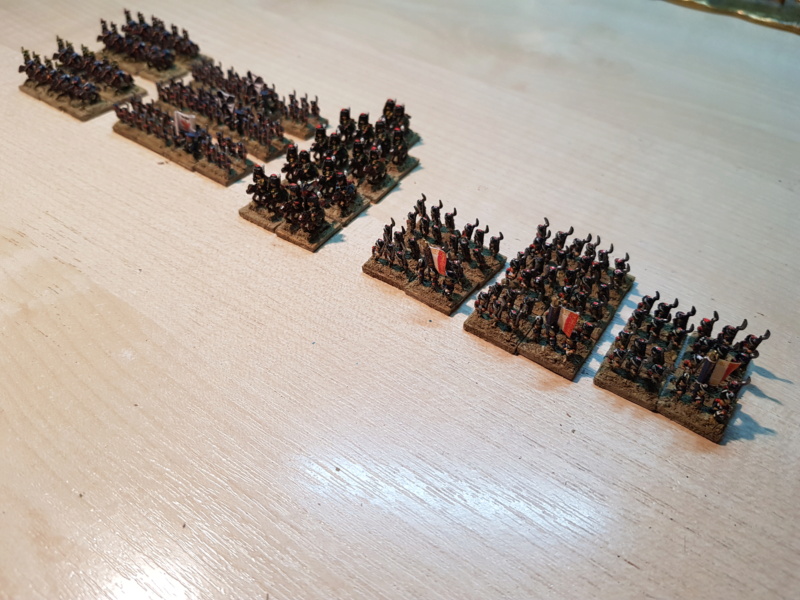
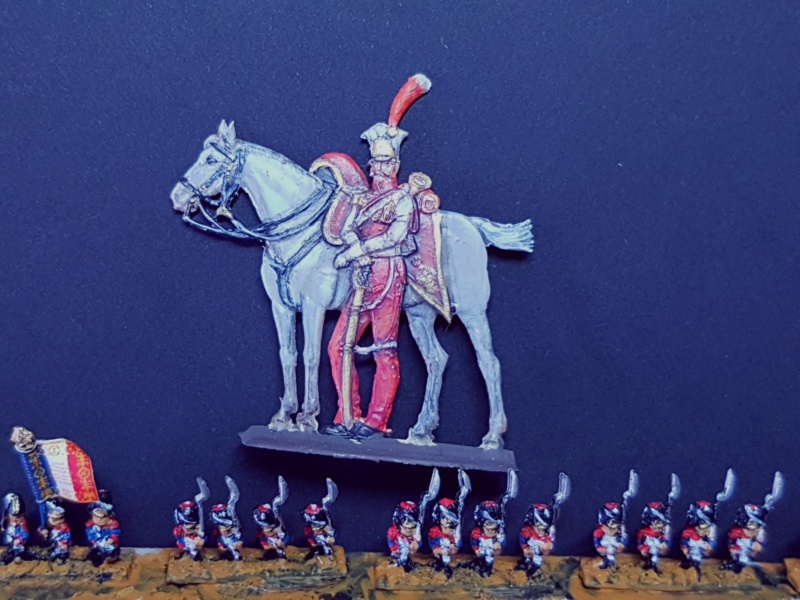
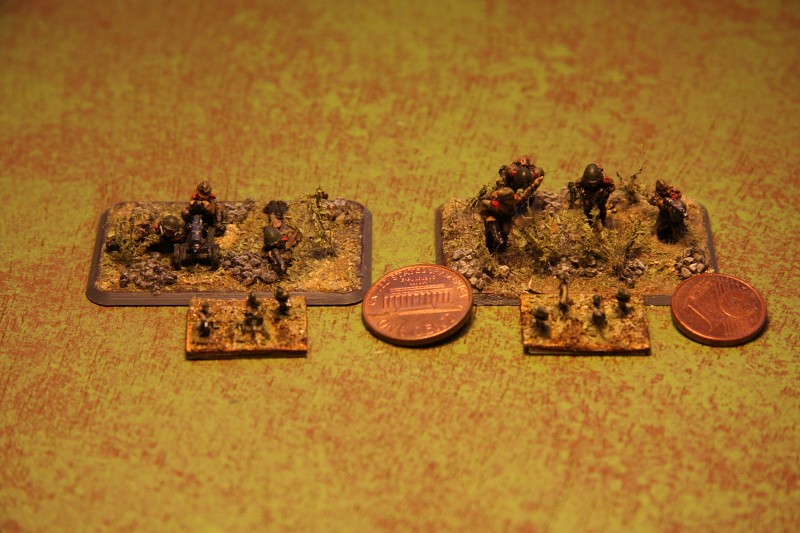
Obviously I bring it with me, and here are some results. To those not knowing 6mm range and/or GHQ (such as me few weeks ago) the header picture shows you two of my 15mm FoW stands (Russian HMG and SMG platoon) and just in front of them, two 6mm GHQ's stands of the same... One cent coins give another idea of the kind of scale we are talking about...

(fr) Vendredi dernier, j'ai eu l'agréable surprise de trouver ma commande GHQ dans ma boite aux lettres. Naturellement, elle m'a accompagnée et voici les premiers résultats. A ceux qui ne connaissent pas le 6mm et/ou GHQ (tout comme moi il y a peu) la photo d'en-tête montre la comparaison de deux bases FoW 15mm et de leur corollaire en 6mm (HMG et SMG russes)... Les pièces d'un cent donnent une idée de la taille....

Here was my very first experiment.
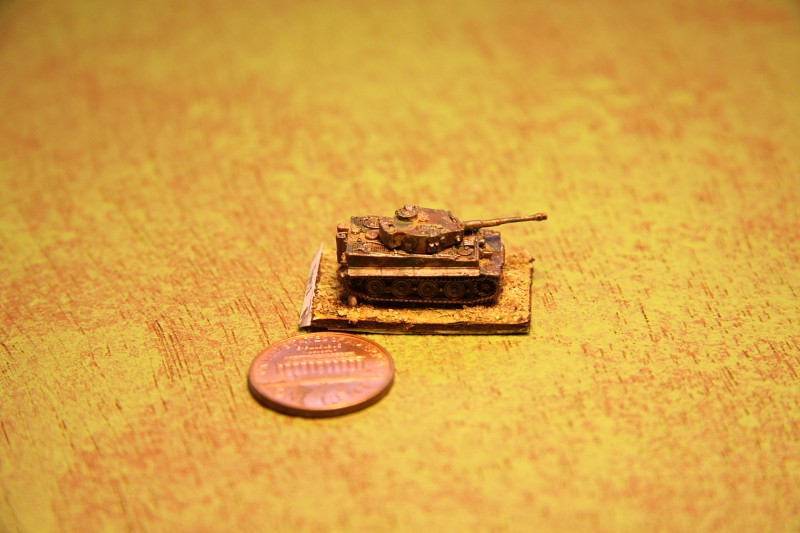
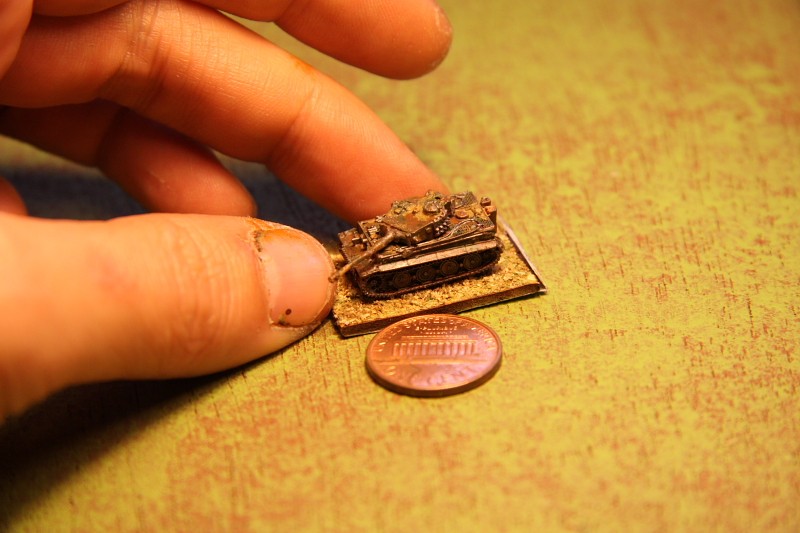
This picture shows a Tiger 1E (GHQ ref. G68) so to give an idea of the precision and detail level vs. the scale. I made the mistake to paint them with "real" colors, that render it far too dark at scale. As well, I tried to chip and dirt him but at the scale result is awfull. I still need to practice...

(fr) Mes premiers pas...
Cette image montre un Tigre 1E (GHQ Ref. G68) tout en donnant une idée du niveau de détail hallucinant pour l'échelle. Premiers essais impliquant premières erreurs, j'ai utilisés des couleurs correctes en 15mm mais le rendu est bien trop sombre pour l'échelle. Itou, j'ai essayé un peu de patine, mais le résultat ne me convient pas. ( tampon de mousse de blister à proscrire en 6mm)

Here, just another view of one of those Tigers, still for scale and detail ratio that simply is crazy...

(fr) Ici, juste une autre vue de l'un de ces petits ;-) tigres, toujours pour voir le niveau de détail à l'échelle, tout simplement hallucinant...


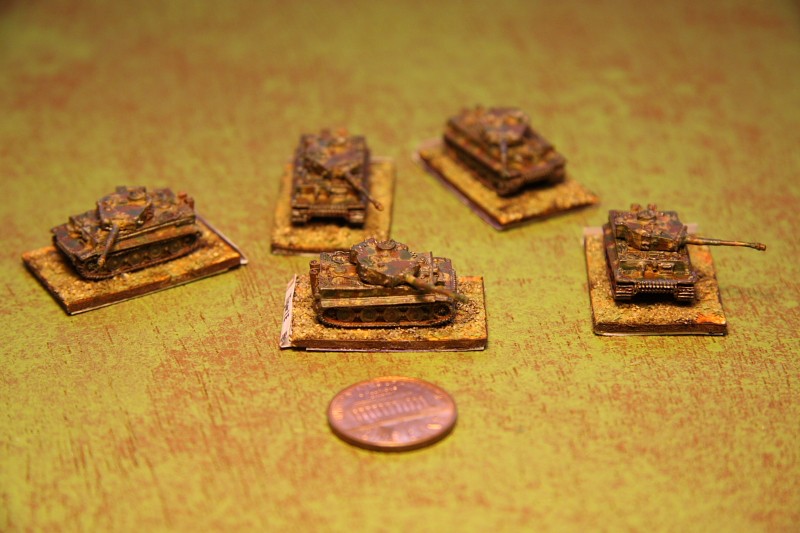
Sooner I said the tiger was GHQ ref. G86, I should have precised that this reference include not one Tiger, but five of them. That makes the Tiger to less than 2$.

(fr) Plus haut j'ai indiqué que ce Tigre était la référence G86 de GHQ. En fait j'aurais du préciser que cette référence inclut cinq d'entre eux. Les voici en meute. A moins de 10$ le pack, ça vous fait le Tigre à moins de ... 1,40 euro.


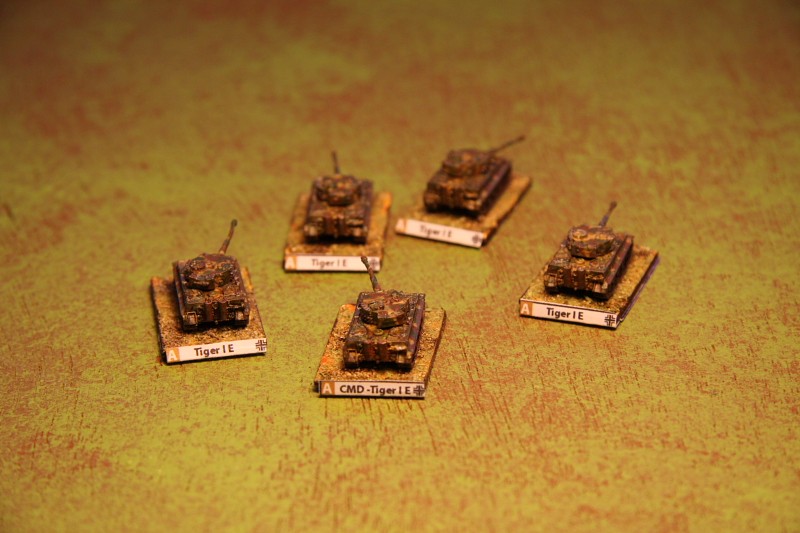
OK, so it's true those are small on the table, so I used my same technic to label them on the table with removable and reusable labels. Here are the Tigers : 4 units plus one command, from the 'A light-brown' platoon. A letter and a color are far enough to identify units (and command chains) without any confusion.
At 15mm scale, I have room to name platoon and dependencies but just having platoon ID, unit type and nationality is enough to immediately identify who is who on the table from a distance. (Label is 2mm height for 1 to 2 cm width)

(fr) OK, c'est vrai que c'est "un peu" petit sur la table, donc j'ai utilisé la même technique que celle que j'utilise pour FoW en 15mm pour les identifier de façon amovible et réutilisable. Ici, on voit les Tigres : 4 unités plus leur commandement du platoon "A- couleur: terre de sienne". Ces deux codes sont largement suffisants pour identifier immédiatement une unité sur la table, et surtout les chaines de commandement et d'observation. En 15mm, les labels sont suffisamment grands pour indiquer le nom de l'unité, mais ici, mis à part un code (lettre+couleur), le type et la nationalité, je n'ai plus vraiement de place. (2mm de haut pour 1 à 2 cms de large...)

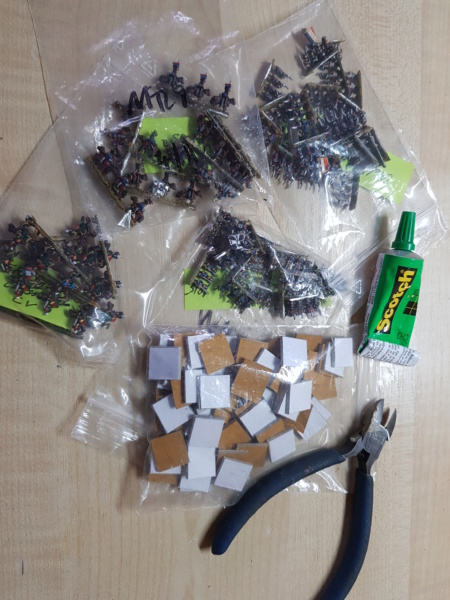
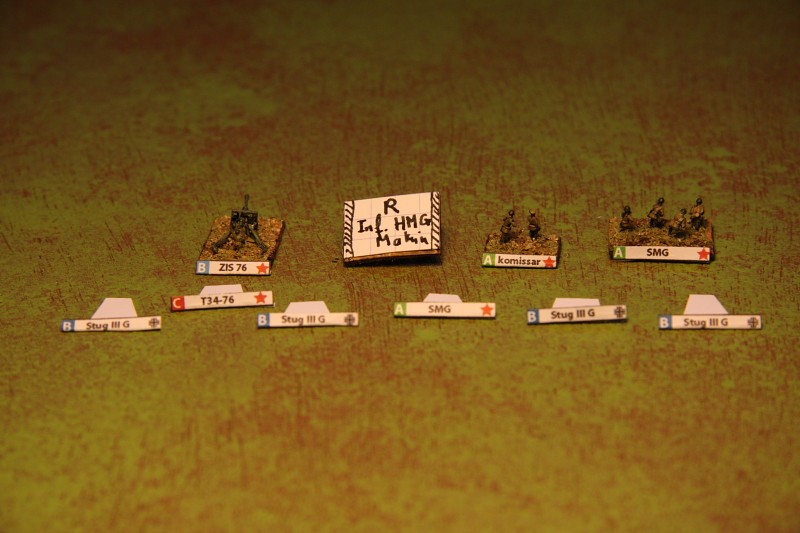
Here is the obvious way it works. You can see units with some labels in place (Russians ZIS 76mm gun, komissar and SMG team), and also the back of another unit base (Russian HMG team).
At front of picture are sample labels. Create them with your favorite tool (OpenOffice Draw for me), print them on heavy paper and fold them. Put some clear varnish to rugedize them. Now, looking at the Maksim HMG stand's bottom, notice the two atched areas on left and right. Those are the areas on which I put glue. Then I put a piece of heavy paper, and then I can insert labels between the base and the heavy paper so to make them visible either from front or rear. Then you can swap rules and troops organizations by simply swapping labels. This way, you can use your Tigers as T34 and... well... OK... let's say that a Rifle platoon can reasonably be used as a Rifle/SMG or saper platoon :-);

(fr) Voici la façon simplissime dont ça fonctionne. On peut voir quelques unités avec un label en place (ZIS 76mm, Commisaire politique et SMG team Russes) et le dessous d'un socle (HMG). En première ligne, se trouvent des labels. Les créer sur son outil de dessin favori (OpenOffice Draw pour moi), les imprimer sur du papier fort, les plier et les découper. Maintenant jetez un oeil sur la base de Maksim HMG retournée. J'ai gribouillé deux zones hachurées. Le truc, c'est de mettre un peu de colle sur ces deux zones uniquement et de placer une sous base de la taille du socle en rodhoid. Une fois la colle sèche on peut insérer nos labels entre socle et sous socle, à l'avant comme à l'arrière. On est donc plus tributaire des règles jouées, de l'organisation, et on peut même raisonablement utiliser un Tigre comme un T34... euh... enfin ... je voulais dire, un platoon de Rifles pour un platoon de Rifles/SMG ou de sapeurs du génie... ;-)

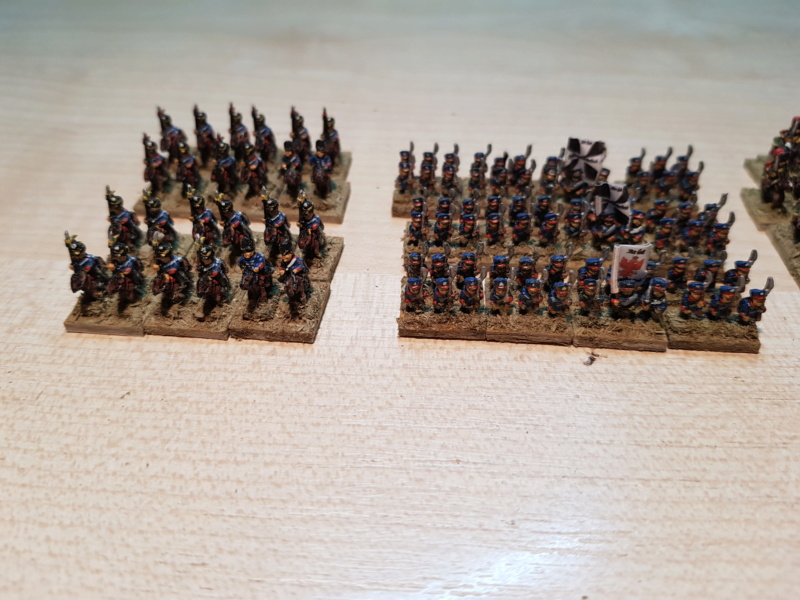
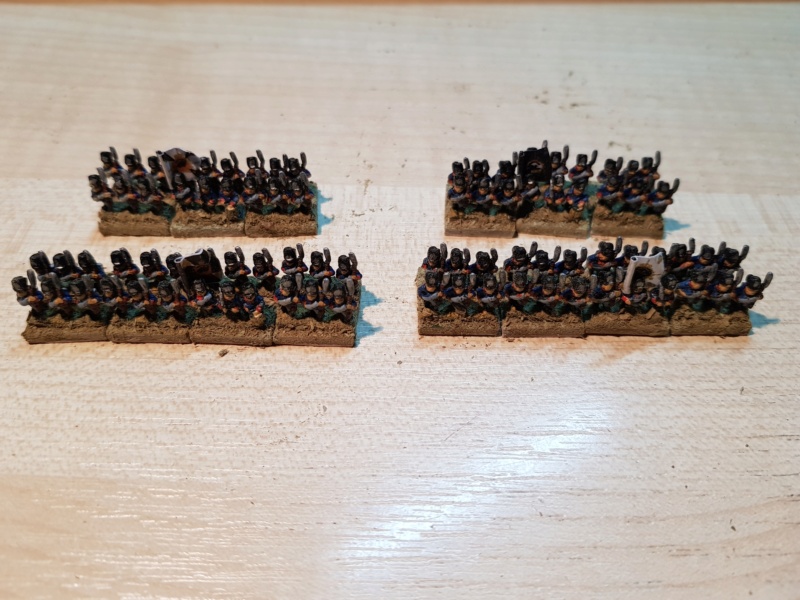
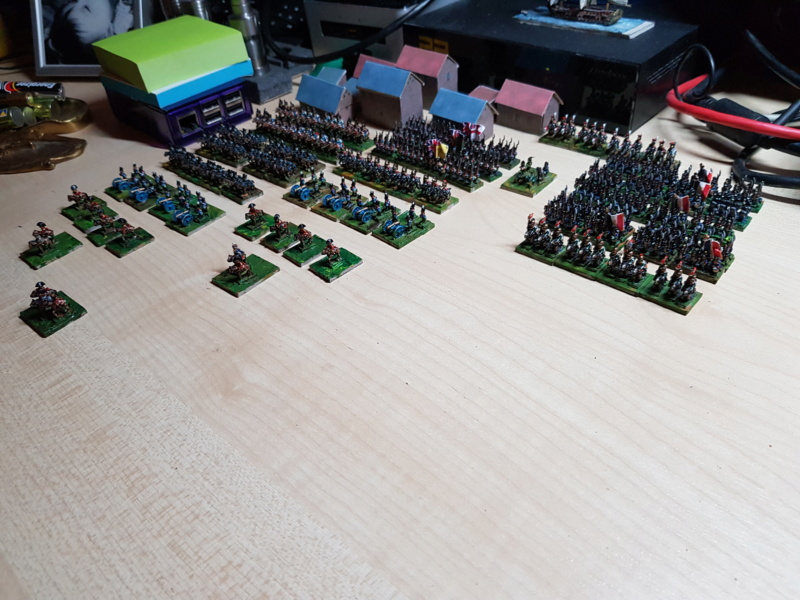
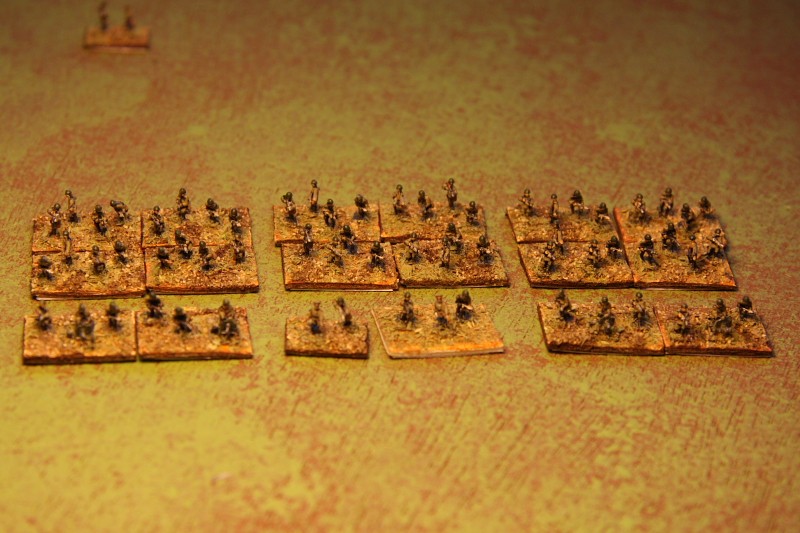
Here is a view of the Russian infantry. This is part of GHQ ref. R48. With that reference, I had enough minis to build a Udarny Strelkovy company at full strength (12 teams, 1 Komissar, 1 command) with 4 Maksim HMG support guns (HMGs were from another pack but the 2 infantry guys per HMG team come from there). Not used from that R48 pack are several officers, two troopers, and a second Komissar team you can see at a distance in the top left corner. Should I add this pack is less than 10$ ? !?

(fr) Voici un aperçu de mon infanterie Russe. C'est une partie du pack R48 de GHQ. Avec cette référence j'ai pu construire une comapgnie Udarny Strelkovy à plein effectif de 12 teams, 1 commissaire politique et un commandement) avec en plus 4 teams de Maksim HMG en support. (Les HMGs viennent d'un autre pack, mais les 2 fantassins sur les bases proviennent de ce pack R48). En plus, du R48, il m'en reste.... en l'occurence, plusieurs officiers, 2 fantassins et la plaquette de commissaire que vous pouvez voir en arrière plan, en hait à gauche. Dois-je ajouter que ce pack coûte moins de 7 Euros ?!?

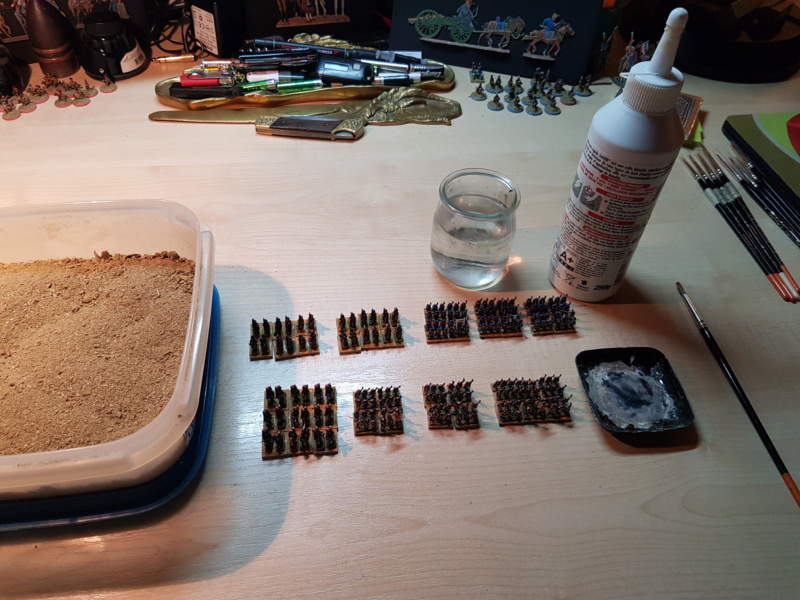
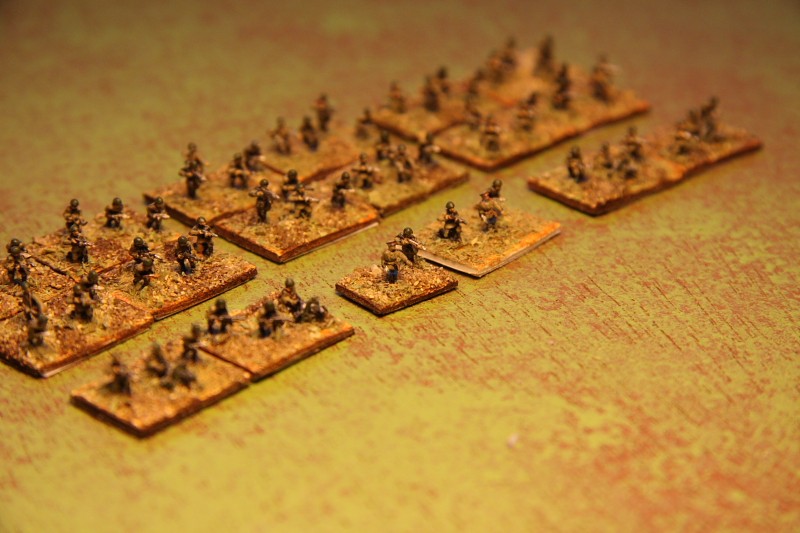
Here is another shot, focusing on the Komissar (should have gone Av before shooting...). For those immagining painting those minis could be a nightmare, let me tell you that it's exactly the reverse. Painting this full company took me no more than 3 hours and was a real pleasure...

(fr) Ici une autre photo avec un focus sur le commissaire politique. J'aurai du passer en Av avant de la prendre... Pour ceux qui s'immaginent que peindre à cet échelle est un cauchemard, permettez moi de dire que c'est exactement l'inverse. Cette compagnie a été peinte en 3 heures à tout casser et c'était un vrai plaisir...

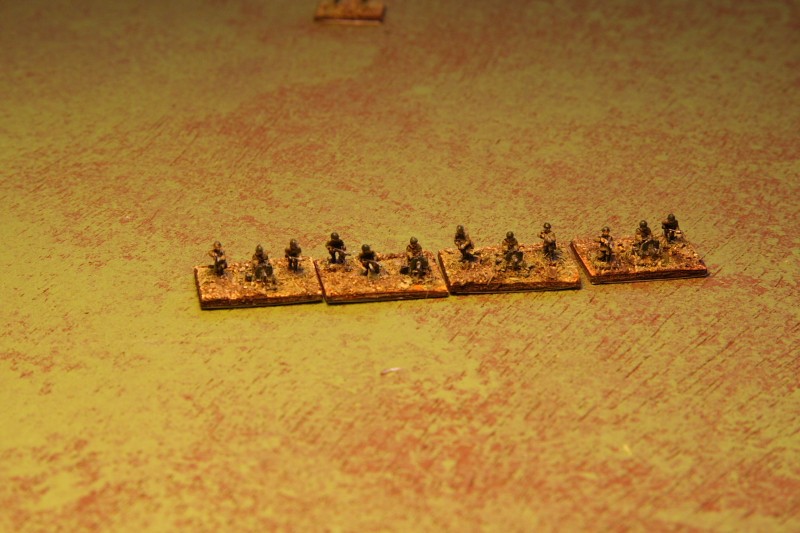
Here are the Maksim HMG teams I built. They are partly done with GHQ's R48 (infantry) and R49 (Heavy weapons) packs. Per base, I put one Maksim (from R49) and 2 soldiers (from R48). In my pack R49 I find no less than 20 MG, 16 HMG, 12 Mortars, 6 Flame throwers,8 observers and 4 officers.
My only concern with this pack is that there are no loaders to either MGs or HMGs, reason why I replaced the missing loaders with infantry men. Also, artillery or infantry come without observers. This pack is the only one providing observers.

(fr) Ici les 4 teams de support HMG Maksim russes. Ils sont faits avec les références R48 et R49. Par base, j'ai utilisé une Maksim (de R49) et deux soldats (de R48). Dans le pack Heavy weapons R49, je n'avais pas moins de 20 MG, 16 HMG, 12 Mortiers, 6 lance flammes, 8 observateurs et 4 officiers.
Mon seul reproche sur ce pack est l'absence d'équipier (servant) pour les MG et HMG. Seuls les mortiers présentent bien deux servants par base. Aussi, il faut savoir que ce pack est le seul à fournir des observateurs.

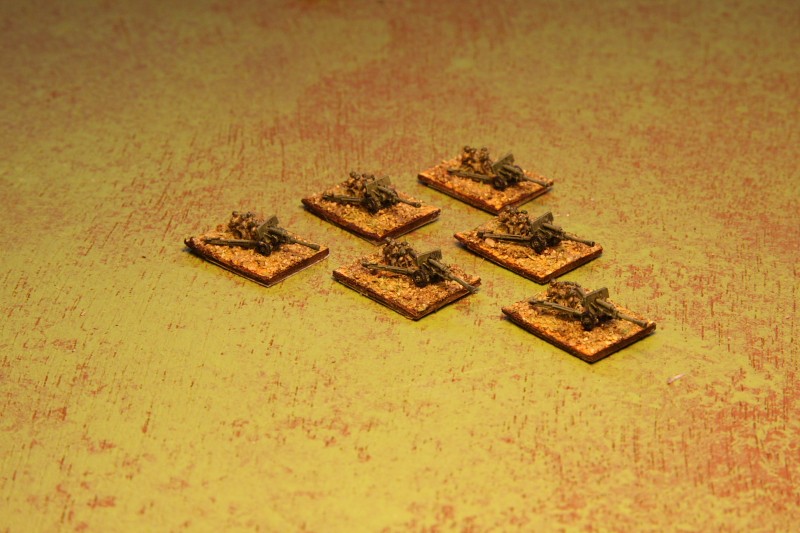
Here is some Russian artillerie. This is simple 76mm "crash-boom(?)" R13 pack from GHQ. I will use them as ZIS 76mm, in other things. They come complete, with teams, 6 a pack, but without observers. I did not wanted to put cents on any picture, but have a look... the team is a bit "tiny" but the guns are really great.

(fr) Un peu d'artillerie Russe. Il sagit de la réf. R13 de GHQ. Je les utiliserai comme des ZIS 76 par défaut, AT ou autre fonction des labels. Ils sont fournis complets : 6 pièces avec leurs servants toujours pour moins de 10$ (mais sans observateurs)... Je n'ai pas voulu mettre des "cents" sur toutes les photos, mais c'est pas l'envie qui manque : Les teams sont un peu "groupés" mais les canons sont superbes.

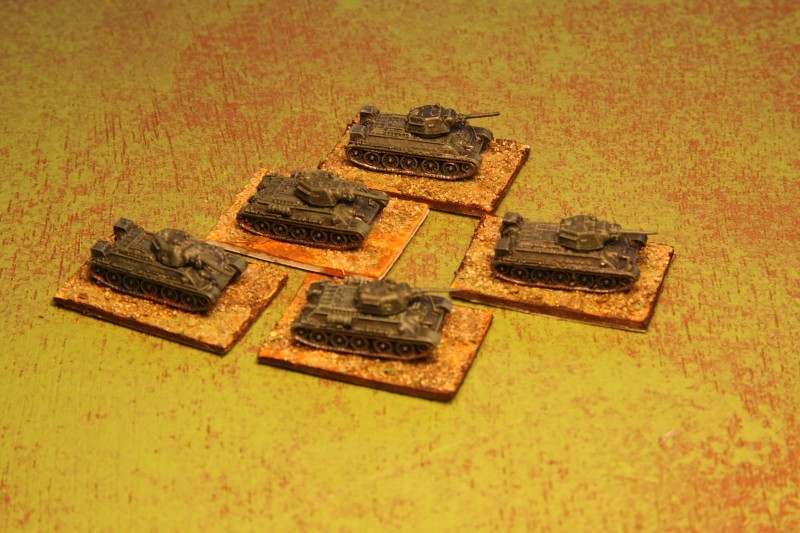
So, after the Tigers, let's talk about "Tiger's meat", sometimes called "poisoned meat" (depends the side you play ;-)) but anyway, let me introduce you the T34-76 1943, GHQ's ref. R18. Another time, pictures talk by themselves. I did not paint details (i.e. tools) because my brushes are too big (painted with a nb 2 and a nb 1), so despite my painting not giving justce to the model, appreciate their quality.
I have decided to glue all vehicules on bases (for labelling and safety of storage) but actually only one of those is glued in place. In addition, I noticed I forgot painting sides of one base... mea culpa... mea granda culpa... mea maxima culpa... ;-)

(fr) Après les "Tigres", parlons de la "Patée pour chat", voire la "mort aux rats" (dépendant du coté que l'on joue ;-)), à savoir du T34-76mm 1943, réf. R18 chez GHQ. La photo parle par elle même, et si ma peinture ne rend pas justice à la finesse du modèle (même pas peint les outils, mes pinceaux sont trop gros (un 2 et un 1 en taille)....), je vous laisse apprécier la finesse.
J'ai décidé de baser tous mes véhicules. D'une part pour identification (labels, cf. plus haut) mais aussi pour faciliter le rangement (A quelques grammes le char, bonjour la valse du tiroir...). Sur la photo un seul T34 est basé. Les autres ne sont que posés sur leur future base (en plus, il y en a une dont les cotés ne sont pas peints : mea culpa, mea granda culpa, mea maxima culpa...)

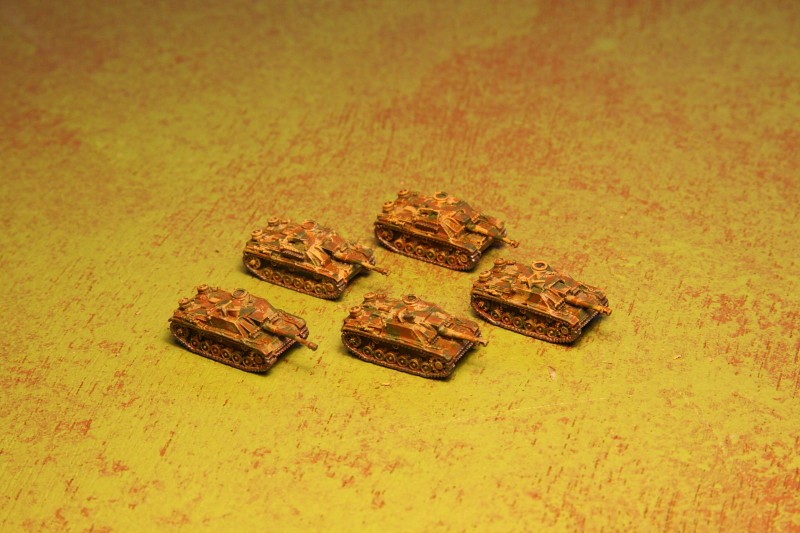
Here are some StuG, ref. G84 from GHQ.
As ever, 5 in a 10$ pack, that I tried to paint in a more clearest tone than the Tigers. I m somewhat happy with them, even if my cammo pattern could have been better...

(fr) Maintenant quelques StuG, ref. G84 chez GHQ. Comme toujours 5 dans un pack à 10$. J'ai éclairci ma peinture et suis plutôt content du résultat, bien que mon camouflage reste un peu grossier. (en 6mm je débute...)

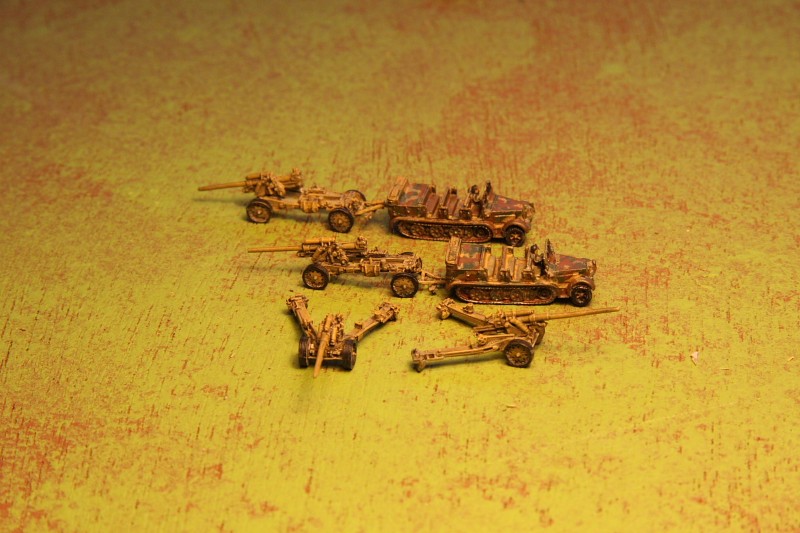
German support artilery, meaning 105mm field guns from GHQ ref. G135. This pack offer you two deployed guns, and two limbered guns, full with limbered gun + train + carrier.
This pack do not include teams. Those are available as a separate reference (currently under coated).

(fr) Artillerie allemande, à savoir des 105 mm, ref. G135 chez GHQ. Ce pack offre 2 pièces d'artillerie déployée, et deux autres en attelage (avec les véhicules tracteurs).


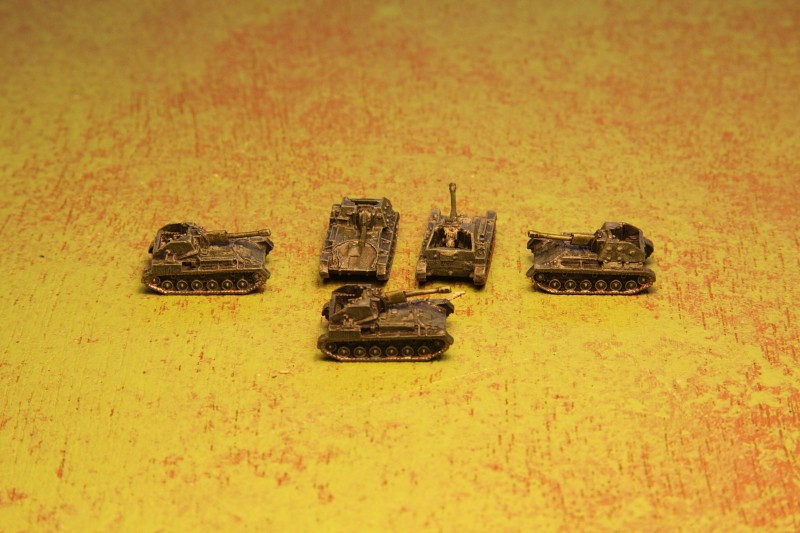
Here are 5 SU-76 from GHQ pack R21. They are not based as well, but I let you appreciate their quality despite basic painting.

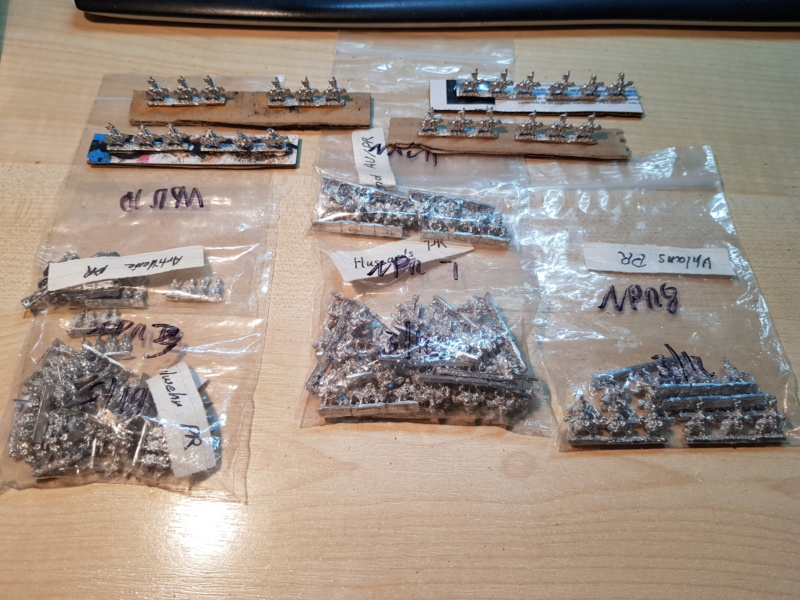
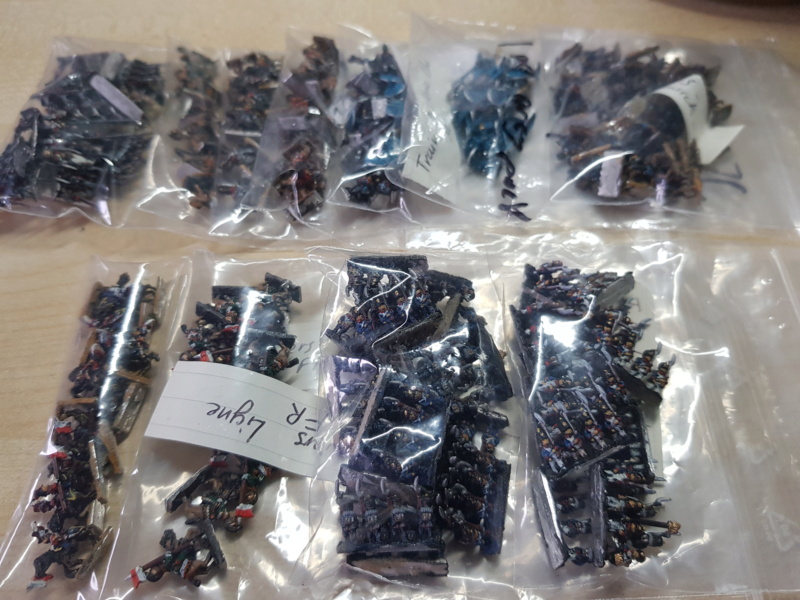
(fr) Voici 5 SU-76 contenu du pack GHQ R21. Leurs bases ne sont pas encore faites, mais appréciez le niveau des minis malgrès la peinture de base...


Still remaining are : German and Russian artillery crews (Germans are on the workbench), German heavy infantry weapons and German infantry. I will post more as I progress.
That order was a test and the result is far more than positive ...
GHQ are very hard to find in France, in fact (AFAIK) they are not distributed any more. I ordered those ones directly from GHQ in the US and was very happy from their packaging and delays (about 3 weeks). Direct international order to serious companies such as GHQ is not really an issue.

(fr) De ma commande originale il me reste les servants d'artillerie Russe et Allemands (les Allemands sont en cours), les armes lourdes d'infanterie allemande (MG,HMG,mortiers,...), ainsi que l'infanterie allemande. Je publierai les résultats au cours de l'avancement.
Cette première commande était un test, et le résultat est plus que positif.
GHQ est très difficile à trouver en France, et à priori ils ne sont plus distribués. J'ai commandé directement chez GHQ aux US et ai été très satisfait du packaging et des délais (de l'ordre de 3 semaines). Avec des sociétés sérieuses comme GHQ, il ne faut pas hésiter à commander directement à l'international.

Cheers,

Bruno.

Saturday, October 31, 2009

First home made trees...


Hi there,

Waiting for my first 6mm real division to come, I've started building some terrain when, at a moment, they will have to proove their value;-). Browsing a nice 6mm forum (angel barracks) I found a post pointing to a video showing stunning way making trees. So, I invented nothing, but would like to share my first attempts and to recommand this technic to any people. (I guess such a tree is less than a Euro cent to build, absolutely stunning, and very, very fast to do...)

(fr) Dans l'attente de mes premières divisions en 6mm j'ai commencé à bosser sur des terrains appropriés à l'échelle. En parcourant un super forum dédié au 6mm je suis tombé sur un post pointant une vidéo montrant comment réaliser des arbres super-réalistes à cette échelle. Donc, je n'ai rien inventé, mais souhaite simplement partager mes premiers pas dans ce domaine. (un arbre coute probablement moins d'un cent d'Euro à produire, a un look ultra-réaliste, et est très rapide à faire....)


Here is all you need to build hundreds of them. First you need a drilling machine with speed regulation that will be used at the lowest possible speed. Except this (that is somewhat expensive) all furnitures are very cheap :
- 1 fixing hairspray, between 2 and 5 Euros.
- some tainted wooddust for flocking (free if asked with a smile at your local wood store with a cutting machine, then tainted with low cost acrylics (green - blue - brown - yellow in various mixes)
- some oakum (?). Not sure of the English word : This is used in plumbing for etancheity and cost very few as well.
- one toothpick (;-))
- some metal wire.
- few common tools : cuting and regular pliers, cissor, and something in wich to put water
- some Johnson excellent Klir floor varnish to fix the tree once done if you have an aerograph, otherwise a matt varnish or fixing spray.

(fr) Sur la photo précédente tout ce dont vous avez besoin. Primo, il faut disposer d'une perceuse à variateur que l'on utilisera au minimum possible de vitesse de rotation. Mis à part la perceuse, l'équipement requis est vraiment low-cost :
- 1 bombe de hair-spray, fixation forte de préférence. (Elle ne suffira pas à sceller le flocage de toute façon, voir plus loin....)
- Du flocage : perso j'utilise de la sciure de bois teintée avec des peintures acryliques de base. Mis à part la peinture, elle ne vous coutera qu'un sourire à l'atelier de scierie ou découpe de bois le plus proche.
- De la filasse de plomberie. Ca se trouve dans toutes es grandes surfaces de bricolage et coute une poignée de rillette pour des centaines d'arbres potentiels.
- 1 cure dent. ;-)
- Du fil de fer de petit diamètre.
-Des outils courants : pince standard et coupante, ciseaux...
- Du Klir de Johnson pour fixer les arbres une fois terminés (si vous disposez d'un aérographe, sinon une bombe de vernis mat ou un fixateur)

So, first step is to cut a part of metal wire, fold it in twice, then out it in the drilling machine and turn the trunk. One trap I realized by falling in is to make a too small trunk. Don't forget it will be easy to cut it if too long, but if too short, nothing can be done... and it will have to be based.
Use the plier to hold the limit of the trunk, and make the drilling machine running as slowly as possible. As ever with such tools think safety first !!! It is not because no visible potentially harming stuff is around (such as a drill) that you should forget about safety.

(fr) La première étape est de couper un bout de fil de fer, de le plier en deux et de le bloquer dans le mandrin de la perceuse. Avec la pince, maintenir fermement les deux brins à hauteur de tron (sous les premières branches à venir) et torsader le tronc en faisant tourner la perceuse très doucement. Une erreur commune est de trop torsader, ou encore de faire des troncs trop courts. N'oubiez pas qu'il faudra socler, que vous pourrez toujours raccourcir le tronc, mais pas le rallonger... Enfin, important : Sécurité avant tout - Le fait qu'il n'y ai pas de foret engagé ne doit pas vous empêcher de penser sécurité. Imaginez le résultat avec la vitesse au max, perussion engagée ... le fil de fer n'est pas fait pour apprendre à voler, et vos yeux ne sont pas faits pour être crevés...

Once your tronk is done, cut one (or more) small length of oakum(?) with scissors. Then, flatten it as shown in the picture. I put the longer length at the base (longer branches) and eventually put several layers, depending on how much you want your tree to be bulky.

(fr) une fois le tronc torsadé, couper une (ou plusieurs) petites longeures de filasse avec des ciseaux. L'étaller comme montré sur la photo. Eventuellement tester plusieurs "couches de filasse" entassées dépendant de l'épaisseur souhaitée pour la ramure. Pensez à mettre les filasses les plus longues en bas.

Next step is to put the Oakum(?) between the two metallic wires and hold the two firmly with a plier. You do not need to hold your pliers at the top of your tree and can let some space as this will be cutted later.

(fr) Ensuite, on coince la filasse entre les deux brins de fil de fer et on tient le tout avec la pince. Nul besoin de tenir juste à la cime de l'arbre, bien au contraire : laissez de la marge, on coupera le surplus plus tard.


Then, operate the drilling machine very slowly. This is important because the Oakum could wrap around the trunk, so if that happen, first stop drilling, then use a toothpick to disengage the Oakum from the wires, and continue drilling.

(fr) Lancer la perceuse à vitesse très réduite. C'est important car la filasse pourrait s'enrouler autour du tronc pendant le vrillage. Si cela se produit, arréter la perceuse, puis, avec le cure dent, dégager la filasse. Ensuite, reprenez.


Here we see the tree borning. Do not hesitate to have a real tightened structure, even if it leads you to broke the wire, either from the plier side or the drilling machine side. If it is not tightened enough the Oakum will escape the structure later on.

(fr) Ici, on voit l'arbre naitre. N'hésitez pas à avoir une structure vraiement très torsadée, même si cela conduit à la rupture du fil de fer au niveau de la pince ou du mandrin de la perceuse. Si les vrilles ne sont pas assez serrées la filasse ne tiendra pas suffisamment en place.


Once you are OK with the result, disengage the tree from the drilling machine, cut the top, and use a toothpick to arrange possible bulky cluster.

(fr) Une fois que le résultat vous convient, désengager l'arbre de la perceuse, coupez la cime, et utilisez le cure dent pour démeller les éventuels amas de filasse.


Then, before hair spray, hair cut... (so logical)
Shape your tree with your scissors.

(fr) Avant le spray, une petite coupe ?
Mettre l'arbre en forme en taillant la filasse avec vos ciseaux. Encore une fois, le mieux est l'énemi du bien : ne taillez pas trop court.


...Up to get a shape you like....

(fr) Ici la forme finale que j'ai retenue pour l'exemple de ce post.


Next step is hair spray. You need some strong hair spray but will not use a lot of it per tree as it won't be enough to seal the flocking stuff in place. For flocking I use wooddust I tainted in various greens.

(fr) Après la coupe, le spray. Mieux vaut avoir un spray fixant ultra fort, mais cela n'empèchera pas de devoir tout fixer au vernis par la suite. Pour le flocage, sciure de bois teintée.

Spray one side, then flock...

(fr) Un petit coup de spray d'un coté, et flocage...


Spray the other side. Don't hesitate if you have some drops of spray : they will not impact the apparence with bad clusters.

(fr) Un petit coup de spray de l'autre... Ne pas hésiter si des goutelettes de spary se forment : Elles ne créeront pas de "pâtés" de flocage. (spray = très volatile)


Repeat on top, bottom, wherever you need to flock in fact, and here it is...
Let it dry and fix the flocking with some sprayed varnish. I used a 50/50 mix of Klir and water. Klir is normally glossy, but wood dust and oakum drink it a bit so it remains flat but really seal the thing in about 30 minutes.

(fr) répéter au dessus, dessous, en fait... partout ou vous pensez devoir rajouter du feuillage.
Laissez sécher, puis fixez le flocage avec un vernis pulvérisé. De mon côté, disposant d'un aérographe, j'utilise du Klir dilué à 50% avec de l'eau. Le klir est normalement brillant, mais ici la sciure (bois) et la filasse (chanvre) boivent le klir, cela permet de consolider le flocage tout en restant mat. Temps moyen de séchage constaté autour de 30 minutes.

So, as I said previously, I did not invent anything there, and probably the original video says it better than I did. Reason of this post was to share my experience of this very nice hint, and the material I used as I could not manage to have the original material used in the video.

Last point : Building the tree of that post took me about 5 minutes, including pictures. Before that I spent one hour making tests (some were not that good), but I think that one can produce tens of those in various sizes in the same time. Not only this is costless, but also very fast. So, real thanks and credits to those who shared the original trick.

(fr) Comme dit précédemment, je n'ai rien inventé et il est probable que la vidéo originale explique les choses mieux que je ne l'ai fait. La raison de ce post est donc de partager mon test de ces techniques, mais aussi les fournitures que l'on peut utiliser en low-cost pour un résultat tout aussi bluffant.

Dernier point: L'arbre de ce post m'a pris autour de 5 minutes, incluant les prises de vues. Avant ça, j'ai passé une heure à faire des tests (plus ou moins réussis, mais peu de déchet), mais je pense qu'une fois la technique acquise on peut faire des dizaines d'arbres dans cette petite heure.
Ce n'est pas seulement économique, mais aussi très rapide... alors... un grand merci à ceux qui ont partagés cette technique sur le net.

Tomorrow I hope having some time to work on marshes and roads.I Will let you know...

(fr) Demain, j'essaierai de travailler un peu sur des marais et des routes. Je vous tiendrais au courant...

Cheers,

Bruno.